בס"ד

הייתם רוצים להכין אצבעות קינדר בואנו בבית? כנסו לגלות איך ותקבלו תענוג אמיתי.


הייתם רוצים להכין אצבעות קינדר בואנו בבית? כנסו לגלות איך ותקבלו תענוג אמיתי.
Would you like to make Kinder Bueno fingers at home? check out my recipe and you're in for a treat.

כבר כמה זמן שמתחשק לי להכין שחזורים של ממתקים, אבל כל פעם קרו דברים שעיכבו אותי או שהיו דברים יותר דחופים ומה גם שאי אפשר לדחוף כמות רבה של מתוקים בפעם אחת :-) .
It has been a while now that I wanted to recreate different kinds of candy bars, but sometimes things happened and stalled me or there were more urgent stuff to do and also I just can't make too many sweets at once :-)

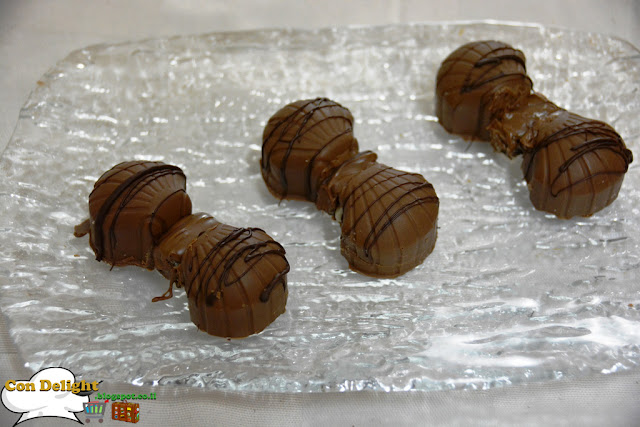
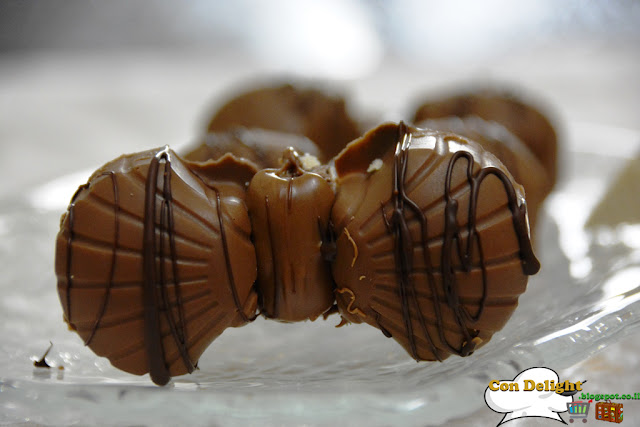
החלטתי להכין אצבעות קינדר בואנו, אותן אצבעות במילוי קרם חלב ואגוזי לוז עם ופל וציפוי שוקולד.
אז כמובן שמדובר בחיקוי למוצר האמיתי, וכבר שנים שלא אכלתי קינדר, אבל מה שבטוח האצבעות האלה מדהימות!!
I have decided to make Kinder Bueno fingers, the same fingers with milk and hazelnut cream with wafer and chocolate coating.
So of course it is just a copycat recipe to the original fingers, and I haven't eaten those fingers in years, but what's certain is - they are amazing!!

מכיוון שאין לי תבנית כמו של אצבעות קינדר, וזה לא ריאלי לקנות תבנית לכל דבר, הכנתי את האצבעות בתבנית פרלינים (יותר כמו תבנית סיליקון שאמורה לשמש ליצירת קוביות קרח) ולאחר שחילצתי את הפרלינים מהתבנית, הצמדתי שני פרלינים למלבן קטן של ופל ע"י "דבק" שוקולד וקיבלתי מעין אצבעות.
Because I don't have a kinder Bueno's mold, and it's not realistic buying a baking pan for everything, I used a praline silicon mold (actually it's a mold for ice cubes) and after taking the pralines out of the mold, I took two pralines and glued them together to a wafer rectangular with milk chocolate and got myself a sweet little finger.


המרכיבים לכ-7-8 אצבעות:
קרם (המתכון לקרם מבוסס על המתכון הזה):
100 גרם שוקולד לבן
1/2 כוס שמנת מתוקה
1/4 כוס אגוזי לוז קלויים ומלוחים
ופלים שאוהבים כ-5-6 יחידות
ציפוי:
כ-250-300 גרם שוקולד חלב
ככפית שמן קנולה
כ-50 גרם שוקולד מריר
אופן ההכנה:
מכינים את קרם אגוזי הלוז:
ממיסים שוקולד לבן ושמנת יחדיו, עד לקבלת תערובת אחידה. טוחנים במעבד מזון את אגוזי הלוז, כך שמתקבלת תערובת מעט רטובה. מוסיפים את תערובת השוקולד הלבן ומערבבים שוב במעבד המזון. מעבירים לקערה עם מכסה ולמקפיא ל-כחצי שעה.
אז, ממיסים את שוקולד החלב במיקרו, כל פעם רק ל-30 שניות, כאשר אחרי כל פעם מערבבים. מוסיפים את השמן ומערבבים היטב.
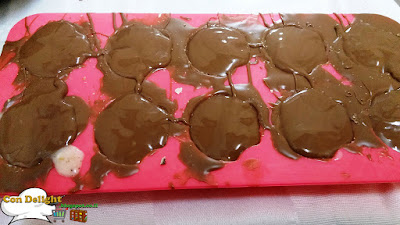
מברישים תבנית פרלינים בשוקולד, מעבירים למקפיא ובמידה והציפוי לא כיסה הכול, מברישים שוב בשוקולד והפעם אין צורך להכניס למקפיא כי התבנית קרה ולכן השוקולד מתקשה יותר מהר (שימו לב שישאר לכם עוד מתערובת השוקולד לשלבים הבאים).
מעבירים את קרם אגוזי הלוז לשקית זילוף ומזלפים לתבנית הפרלינים ל-כ-2/3 גובה. לוקחים כ-3-4 ופלים, חותכים לחתיכות קטנות ומניחים מעל קרם אגוזי הלוז. ממלאים בשוקולד החלב שנותר ומעבירים למקפיא לכמה דקות עד שמתקשה.
מוציאים מהתבנית, לוקחים ופל וחותכים אותו למלבנים קטנים. מורחים מעט שוקולד על צד אחד של פרלין ומדביקים למלבן הופל. מצפים את הופל בשוקולד חלב, מורחים את הפרלין השני גם כן במעט שוקולד חלב ומצמידים לצידו השני של הופל.
ממיסים שוקולד מריר ובעזרת מזלג טבול בשוקולד שמזיזים במהירות מעל הפרלינים, יוצרים קישוט יפה.
לשמור במקרר ובתאבון :-)
Ingredients for 7-8 fingers:
Cream (the cream recipe is based on this):
100 gram white chocolate
1/2 cup whipping cream
1/4 cup roasted and salted hazelnut
Cream (the cream recipe is based on this):
100 gram white chocolate
1/2 cup whipping cream
1/4 cup roasted and salted hazelnut
5-6 units of wafers
Coating:
about 250-300 gram of milk chocolate
a teaspoon of canola oil
about 50 gram of bittersweet chocolate
about 250-300 gram of milk chocolate
a teaspoon of canola oil
about 50 gram of bittersweet chocolate
Preparation:
Make the hazelnut cream:
Melt together the white chocolate and whipping cream, until you get a unified mixture.
Process the hazelnut in a food processor, until you get a bit of a wet crumbs.
Add in the white chocolate mixture and mix again. Transfer into a bowl with a lid and freeze for about 30 minutes.
Then, Melt the milk chocolate in the microwave, about 30 seconds each time, when after each session you mix the chocolate. Add in canola oil and mix well.
Brush the praline mold with the melted chocolate and transfer into the freezer until set. If the first coating wasn't enough, cover with another layer and this time you don't have to place it in the freezer, because the mold is cold and that will make the chocolate harden faster (pay attention that there will be leftover from the chocolate coating for two other steps).
Transfer the hazelnut cream into a piping bag and pipe about 2/3 of the mold.
Take 3-4 wafers, cut into small pieces and place on top of the hazelnut cream.
Fill the rest of the mold with the milk chocolate and place in the freezer until set.
Take the pralines out of the mold, take a wafer and cut it into small rectanfulars.
Srpread a bit of milk chocolate on one side of the praline, take the wafer and stick it to the praline. Coat with milk chocolate, take another praline that is covered with chocolate glue and stick to the other side of the wafer.
Melt bittersweet chocolate and using a fork dipped in chocolate, tilt it back and forth above the pralines to make a nice coating.
Keep in the refrigerator and enjoy!
Linking up at:
http://homemadeforelle.com/roll-linky-party-33/
אני משתפת גם בקבוצת הפייסבוק "טעמים", מוזמנים להצטרף.
אין תגובות:
הוסף רשומת תגובה
Thank you for commenting!
Really enjoy hearing from you!
תודה על שהגבתם! מאוד שמחה לשמוע מכם!