בס"ד

אחרי לילה במקרר, עוגת השוקולד והגבינה הזו הייתה מעט חמצמצה, אבל מאוד טעימה, וכמו כל עוגת גבינה טובה, אחרי עוד יום, היא הייתה פשוט מדהימה. החמצמצות נעלמה והיה קשה לא לרצות לקחת חתיכה נוספת.


את העוגה הזו ראיתי בספר האפייה של Better homes and gardens.
זה נהפך להיות אצלי ממש הרגל לשנות מתכונים ולא לפעול לפי מה שכתוב במתכון, אם זה מטעמי נוחות או מחשבה שכך עדיף, אז המתכון כאן הוא לא כמו המתכון בספר, ואני שמחה שעל אף ששיניתי את המתכון, יצאה עוגה פשוט מעולה שהיא ממש חגיגה של טעמים בפה.


עד לפני כמה שנים הייתה לי תפיסה בראש של שוקולד וגבינה לא ההולכים יחד, פירות בעוגה? ממש לא, אבל לאט לאט התחלתי יותר לנסות דברים וחלקם גם היו טעימים וזה פשוט כיף גדול להתנסות בשילובי טעמים שעד כה לא הכרתי ואני מתכוונת כאן גם בנושא הבישול, אם עד כה היה לי במטבח רק תבלינים בסיסיים, עכשיו הכנסתי בהרט והל וג'ינג'ר ועוד, שבשבילי זה פשוט חגיגה חדשה של טעמים. תעזו, תנסו ולכו תדעו, אולי יצא לכם המעדן הבא שיכבוש את העולם.

העוגה הזו פשוט צועקת שבועות :-), ואם תחליפו את הפתי בר בעוגיות ללא גלוטן, יש לכם גם עוגת גבינה ללא גלוטן נפלאה וטעימה.
עוגות שאין בהם כמעט קמח נוטות יותר להישבר למעלה, ולכן לאחר האפייה היו שני סדקים קלים (תוכלו לראות בתמונות).
מאז שהחלפתי את התנור שלי לתנור אחר, הכנתי את העוגה הזו כל כך הרבה פעמים ותמיד היא יוצאת לי במראה שונה לגמרי ממה שראיתם עד עכשיו. מצרפת לכם למטה תמונות של איך שהעוגה יוצאת לי עכשיו, יוצאת עדיין מאוד יפה וכל כך טעימה וקרמית. מה שמעניין שבתנור החדש, לא נוצרים בכלל סדקים בעוגה.


המרכיבים לתבנית 24 ס"מ או 26 ס"מ:
3 גבינת שמנת (225 גרם כל אחת)
3 ביצים L, טרופות
שרוול פתי בר (250 גרם)
100 גרם חמאה, מומסת
50 גרם שוקולד חלב, מגורר
100 גרם שוקולד חלב, שבור לקוביות
3/4 כוס סוכר
1/2 כוס חלב
2 כפיות תמצית וניל
2 כפות קורנפלור או קמח
100 גרם שוקולד מריר, שבור לקוביות
2 כפות חלב
אופן ההכנה:
מניחים את הביצים והגבינה מחוץ למקרר, על מנת שיגיעו לטמפרטורת החדר.
מחממים תנור ל-175 מעלות, טורבו.
במעבד מזון, מפוררים את הפתי בר, מוסיפים את החמאה המומסת ומערבבים עוד קצת.
מעבירים את תערובת הפתי בר לתבנית עגולה מתפרקת בגודל 24 או 26 ס"מ (אני מצפה את תחתית התבנית מסביב בנייר אלומיניום, על מנת שלא ידלוף שום נוזל מהתבנית) ומצפים עם תערובת הפתי בר את התחתית והדפנות של התבנית. מפזרים מעל שוקולד חלב מפורר ומניחים בצד.
ממיסים את 100 גרם שוקולד החלב ומניחים בצד להתקרר.
מערבבים היטב את הגבינות, הסוכר, הביצים, חצי כוס החלב ותמצית הווניל עד שקרמי. מערבבים פנימה את השוקולד המומס ולאחר מכן את הקמח.
משאירים חצי כוס מתערובת הגבינה בצד ואת יתרת התערובת יוצקים לתבנית.
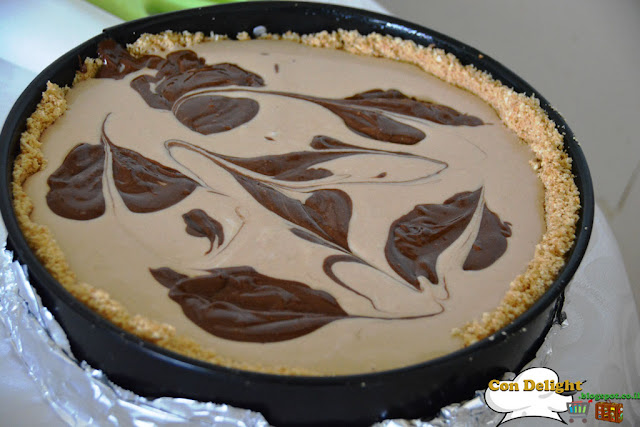
ממיסים את השוקולד המריר, מניחים לו מעט להתקרר ואז מערבבים אותו ביחד עם חצי הכוס שהשארנו בצד ו-2 כפות החלב. בעזרת כף, מניחים נקודות על תערובת הגבינה הלבנה ובעזרת גב של סכין, יוצרים צורות. לי יצאו צורות של עלים על ידי כך שמשכתי מהאמצע של העיגול החוצה ואח"כ משכתי מהר מנקודה לנקודה וזו התוצאה.
אופים כ-55 דקות באמצע התנור, העוגה יוצאת כשהיא מעט רוטטת וזה בסדר גמור.
מניחים לה להתקרר מחוץ לתנור, אך עדיין בתוך התבנית, כ-30 דקות. מעבירים למקרר לפחות ללילה. ואז מנסים לחלץ את העוגה מהתבנית, אם לא מצליח, ניתן בעזרת סכין לעבור סביב היקף העוגה

אחרי לילה במקרר, עוגת השוקולד והגבינה הזו הייתה מעט חמצמצה, אבל מאוד טעימה, וכמו כל עוגת גבינה טובה, אחרי עוד יום, היא הייתה פשוט מדהימה. החמצמצות נעלמה והיה קשה לא לרצות לקחת חתיכה נוספת.
After a night in the fridge, this chocolate cheesecake was a bit sour, but very delicious, and like every good cheesecake, after another day in the fridge, it was Amazing! The sourness disappeared and it was hard not wanting to take another slice.


את העוגה הזו ראיתי בספר האפייה של Better homes and gardens.
זה נהפך להיות אצלי ממש הרגל לשנות מתכונים ולא לפעול לפי מה שכתוב במתכון, אם זה מטעמי נוחות או מחשבה שכך עדיף, אז המתכון כאן הוא לא כמו המתכון בספר, ואני שמחה שעל אף ששיניתי את המתכון, יצאה עוגה פשוט מעולה שהיא ממש חגיגה של טעמים בפה.
I saw this cake on Better homes and gardens cookbook.
It has become an habit of mine to change recipes and not going according to the instructions, and I am really glad I succeeded in this cake and it turned out to be a real celebration of flavors.


עד לפני כמה שנים הייתה לי תפיסה בראש של שוקולד וגבינה לא ההולכים יחד, פירות בעוגה? ממש לא, אבל לאט לאט התחלתי יותר לנסות דברים וחלקם גם היו טעימים וזה פשוט כיף גדול להתנסות בשילובי טעמים שעד כה לא הכרתי ואני מתכוונת כאן גם בנושא הבישול, אם עד כה היה לי במטבח רק תבלינים בסיסיים, עכשיו הכנסתי בהרט והל וג'ינג'ר ועוד, שבשבילי זה פשוט חגיגה חדשה של טעמים. תעזו, תנסו ולכו תדעו, אולי יצא לכם המעדן הבא שיכבוש את העולם.
A few years ago I had a perception that chocolate and cheese aren't a good match, fruit in a cake? maybe fruitcake and that's it :-) , but slowly I started trying new stuff and some were really good and it is just a great fun trying and experimenting with new flavors. Of course I mean in cooking too, if at first you could only find in my kitchen the basic spices, not I have spices like Bhaarat, Cardamom, ginger etc, which to me is just exciting. Dare to try new stuff, you might develop the next best treat the world will love.

העוגה הזו פשוט צועקת שבועות :-), ואם תחליפו את הפתי בר בעוגיות ללא גלוטן, יש לכם גם עוגת גבינה ללא גלוטן נפלאה וטעימה.
עוגות שאין בהם כמעט קמח נוטות יותר להישבר למעלה, ולכן לאחר האפייה היו שני סדקים קלים (תוכלו לראות בתמונות).
מאז שהחלפתי את התנור שלי לתנור אחר, הכנתי את העוגה הזו כל כך הרבה פעמים ותמיד היא יוצאת לי במראה שונה לגמרי ממה שראיתם עד עכשיו. מצרפת לכם למטה תמונות של איך שהעוגה יוצאת לי עכשיו, יוצאת עדיין מאוד יפה וכל כך טעימה וקרמית. מה שמעניין שבתנור החדש, לא נוצרים בכלל סדקים בעוגה.
This cake just screams Pentecost :-), and if you replace the petit beurre in gluten free cookies, you will get a delicious and wonderful gluten free cheesecake.
These kind of cakes who don't contain a lot of flour tend to break, so after baking I did have tiny cracks on the surface of the cake (you can see in the photos).
Ever since I changed my oven to another one, I made this cakes a lot of times and it always come out differently than what you've seen till now in the photos. I'm attaching below photos from how it comes out now, it still is very beautiful and delicious and creamy. What's interesting is that in the new oven, there are no cracks in the cake.
Ever since I changed my oven to another one, I made this cakes a lot of times and it always come out differently than what you've seen till now in the photos. I'm attaching below photos from how it comes out now, it still is very beautiful and delicious and creamy. What's interesting is that in the new oven, there are no cracks in the cake.


המרכיבים לתבנית 24 ס"מ או 26 ס"מ:
3 גבינת שמנת (225 גרם כל אחת)
3 ביצים L, טרופות
שרוול פתי בר (250 גרם)
100 גרם חמאה, מומסת
50 גרם שוקולד חלב, מגורר
100 גרם שוקולד חלב, שבור לקוביות
3/4 כוס סוכר
1/2 כוס חלב
2 כפיות תמצית וניל
2 כפות קורנפלור או קמח
100 גרם שוקולד מריר, שבור לקוביות
2 כפות חלב
אופן ההכנה:
מניחים את הביצים והגבינה מחוץ למקרר, על מנת שיגיעו לטמפרטורת החדר.
מחממים תנור ל-175 מעלות, טורבו.
במעבד מזון, מפוררים את הפתי בר, מוסיפים את החמאה המומסת ומערבבים עוד קצת.
מעבירים את תערובת הפתי בר לתבנית עגולה מתפרקת בגודל 24 או 26 ס"מ (אני מצפה את תחתית התבנית מסביב בנייר אלומיניום, על מנת שלא ידלוף שום נוזל מהתבנית) ומצפים עם תערובת הפתי בר את התחתית והדפנות של התבנית. מפזרים מעל שוקולד חלב מפורר ומניחים בצד.
ממיסים את 100 גרם שוקולד החלב ומניחים בצד להתקרר.
מערבבים היטב את הגבינות, הסוכר, הביצים, חצי כוס החלב ותמצית הווניל עד שקרמי. מערבבים פנימה את השוקולד המומס ולאחר מכן את הקמח.
משאירים חצי כוס מתערובת הגבינה בצד ואת יתרת התערובת יוצקים לתבנית.
ממיסים את השוקולד המריר, מניחים לו מעט להתקרר ואז מערבבים אותו ביחד עם חצי הכוס שהשארנו בצד ו-2 כפות החלב. בעזרת כף, מניחים נקודות על תערובת הגבינה הלבנה ובעזרת גב של סכין, יוצרים צורות. לי יצאו צורות של עלים על ידי כך שמשכתי מהאמצע של העיגול החוצה ואח"כ משכתי מהר מנקודה לנקודה וזו התוצאה.
אופים כ-55 דקות באמצע התנור, העוגה יוצאת כשהיא מעט רוטטת וזה בסדר גמור.
מניחים לה להתקרר מחוץ לתנור, אך עדיין בתוך התבנית, כ-30 דקות. מעבירים למקרר לפחות ללילה. ואז מנסים לחלץ את העוגה מהתבנית, אם לא מצליח, ניתן בעזרת סכין לעבור סביב היקף העוגה
Ingredients for 24 or 26 cm spring form pan:
3 packages of cream cheese (225 gram each)
3 L eggs, beaten
250 gram petit beurre cookies/ shortbread
100 gram butter, melted
50 gram milk chocolate, grated
100 gram milk chocolate, cut into chunks
3/4 cup sugar
1/2 cup milk
2 tsp. vanilla extract
2 Tbsp. cornstarch or flour
100 gram bittersweet chocolate, cut into chunks
2 Tbsp. milk
Preparation:Set the eggs and cream cheese outside the refrigerator to get to room temperature.
Preheat the oven to 175C/347F, turbo.
In a food processor, crumble the cookies and then add the melted butter and mix a bit more.
Transfer the mixture into the spring form pan (I wrapped the outside of the pan with aluminum foil, so there won't be any liquid spills) and press the crumbles to the bottom and sides. Sprinkle on top with grated milk chocolate and set aside.
Melt the milk chocolate and set aside to cool a bit. Meanwhile, mix the cheese, sugar, half cup of milk, eggs and vanilla extract until creamy.
Add the melted milk chocolate and mix and then the flour (or cornstarch) and mix again.
Leave 1/2 a cup of cheese mixture aside and pour the remains to the pan. Melt bittersweet chocolate, let cool a bit and then mix together with the 1/2 cup of cheese mixture and 2 tablespoons of milk.
With a spoon, make dots or dollops of chocolate and using the back of a knife, draw shapes. I drew leave shapes by dragging the knife from the center of a dollop outside and then I just continue taking the knife from one dot to the other.
Bake for 55 minutes in the middle rack of the oven, the cake will still shake and that is okay.
Let it cool outside the oven for 30 minutes and then Place in the refrigerator for at least a night. Try to take it out of the spring form pan. If it doesn't go smoothly, use the back of a knife to go through the circumference.
אין תגובות:
הוסף רשומת תגובה
Thank you for commenting!
Really enjoy hearing from you!
תודה על שהגבתם! מאוד שמחה לשמוע מכם!